
Start here
Getting started
What you need to know during your first week with RCSync — from accepting your invite through sending your first campaign.
Sign in for the first time
RCSync uses two-step sign-in: your password plus a one-time code sent to a phone number you verify on first login.
- •
Open the invite email
Your RCSync admin sends invites by email, by RCS, or both. The link expires after a fixed window — if it lapses, ask an admin to resend. - •
Set your password and verify your phone
On the invite acceptance page, set a password and verify the phone number that will receive your sign-in codes. You only do this once; future sign-ins reuse the verified number. Passwords need at least 12 characters, with at least one uppercase letter, one lowercase letter, one number, and one special character. The form shows checkmarks as you type so you can see what's still missing. - •
Sign in
Visit /login, enter your email and password, then enter the one-time code sent to your phone. If your admin has enabled email codes, you can choose “Email a code instead” on the verification step to have the code sent to your account email instead of by text.
Complete brand onboarding
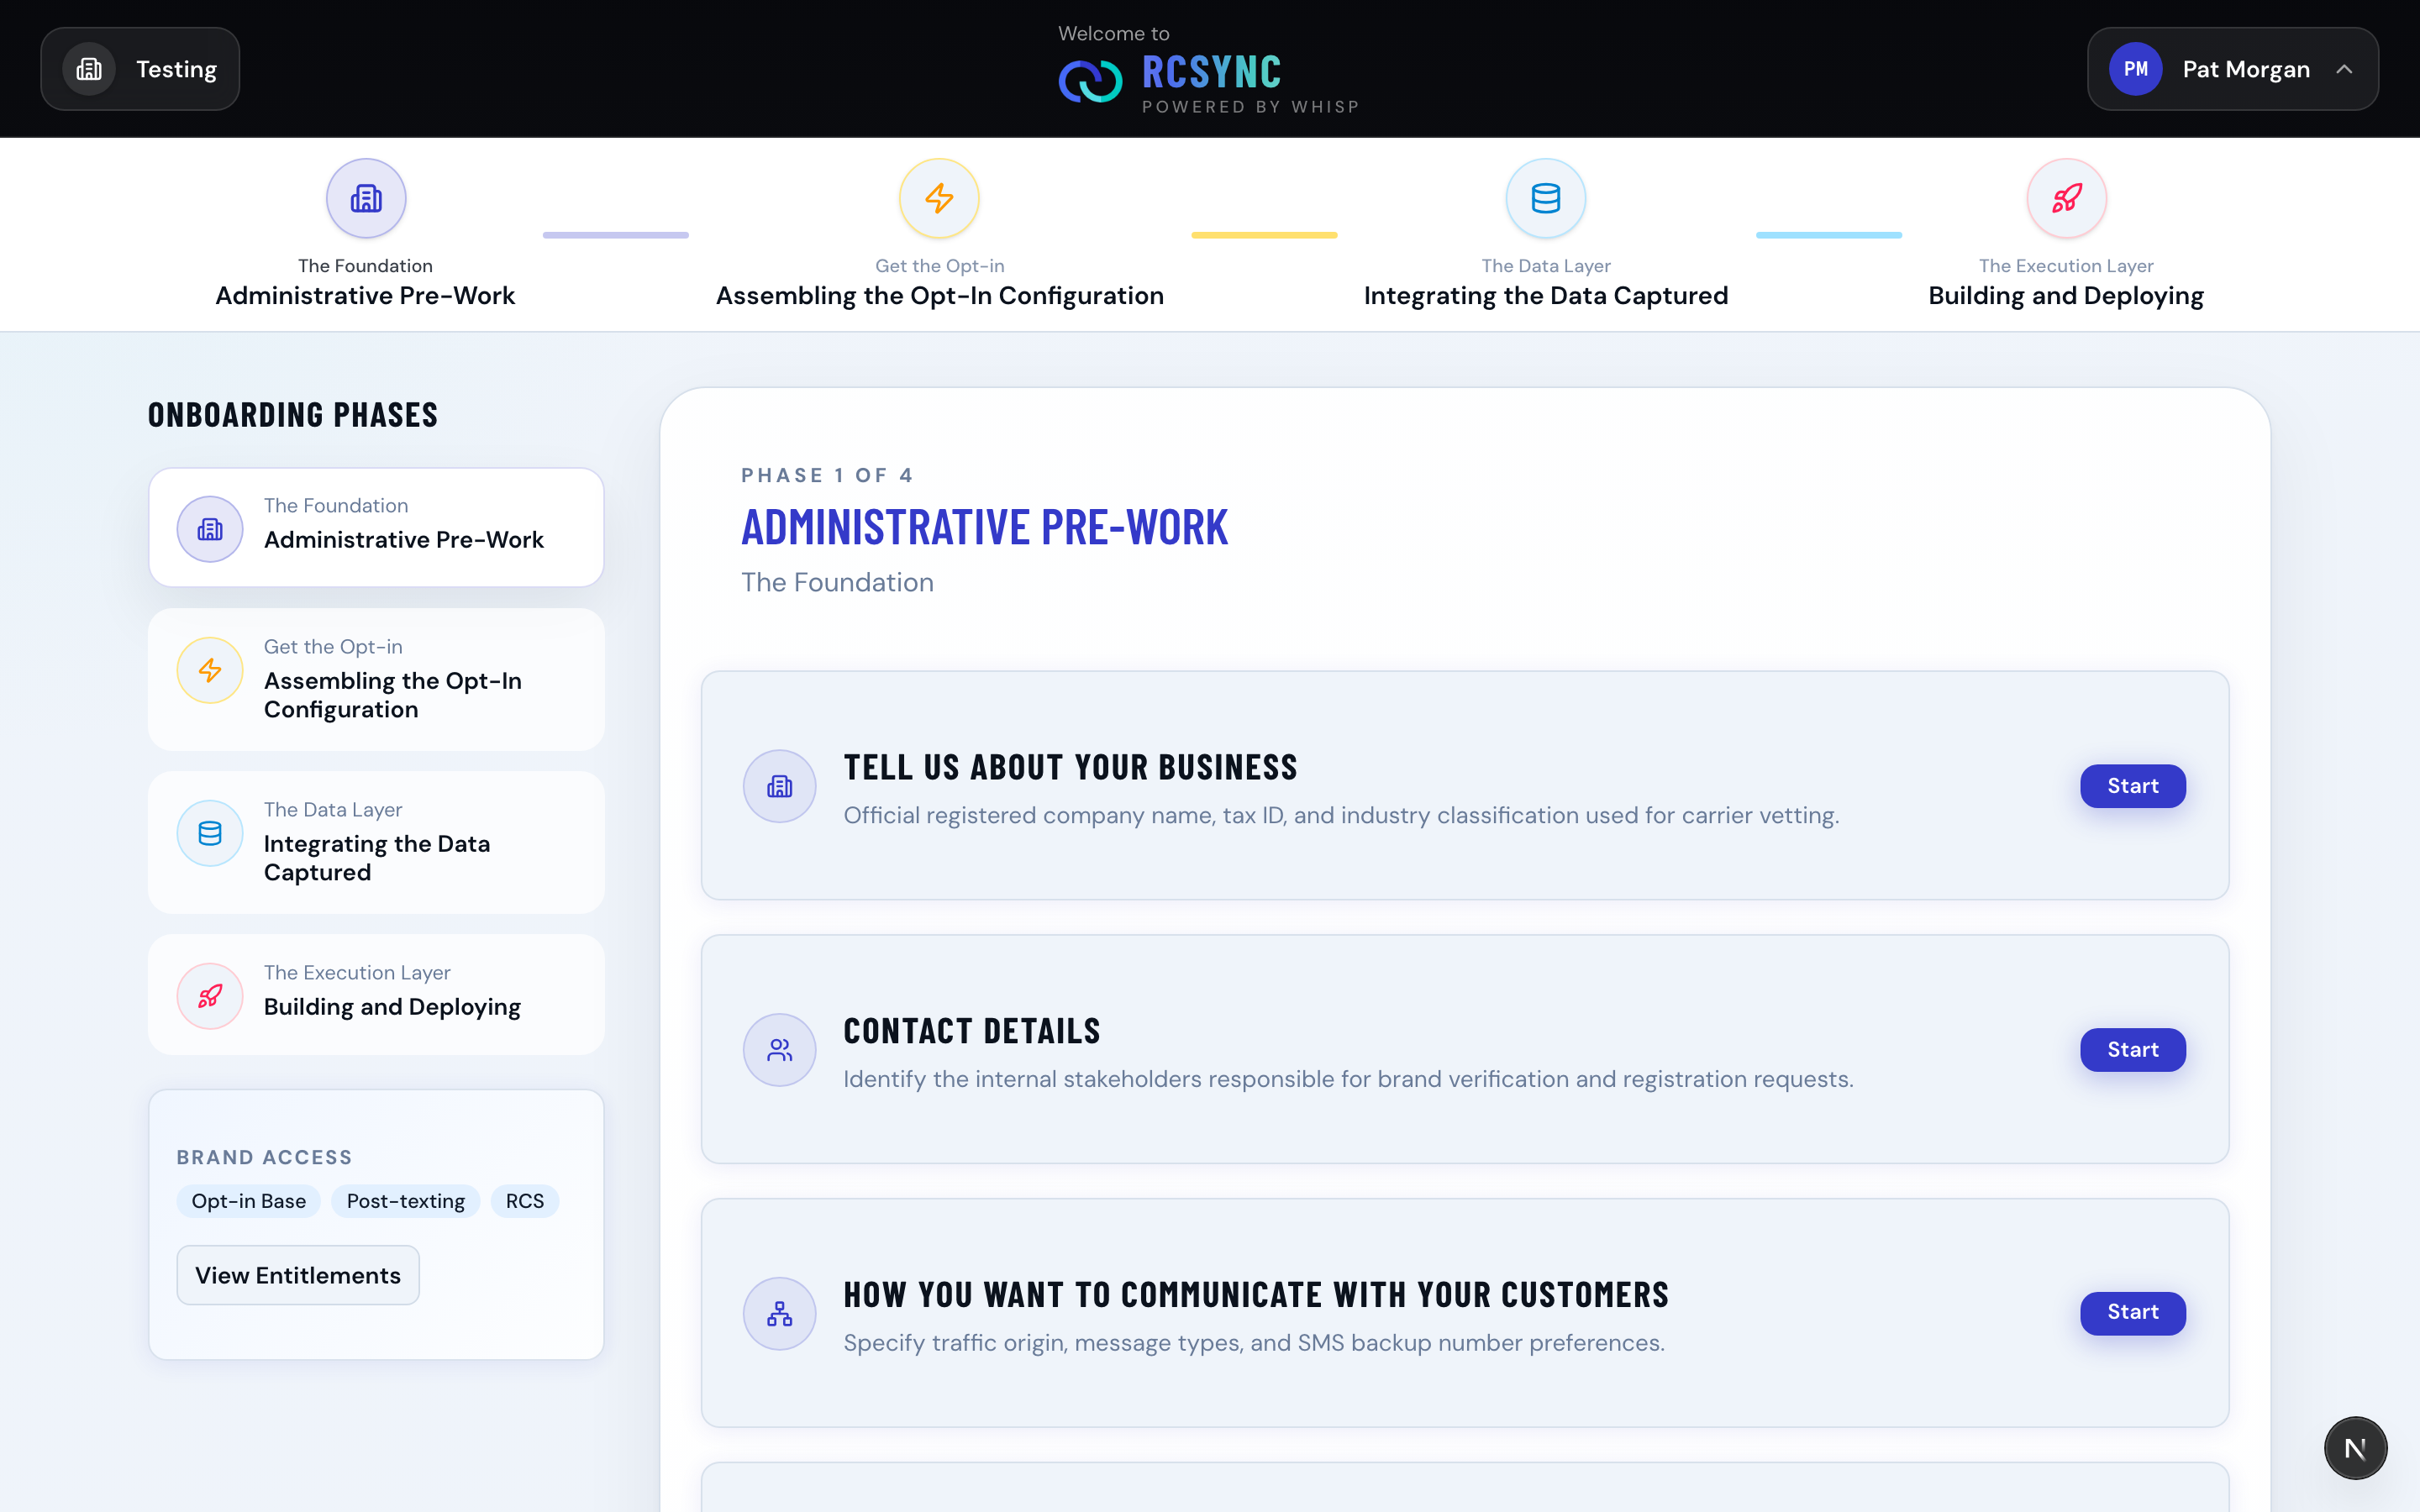
Before you can send anything, your brand has to finish RCS onboarding. The first time you sign in, RCSync drops you straight into the onboarding wizard.
The four phases
Onboarding is organized into four phases. You can see all of them in the strip at the top and in the “Onboarding Phases” list on the left.
- Administrative Pre-Work — The Foundation. The only phase you need to fill out right now. Covers everything the RCS provider needs to vet your brand and approve your sender.
- Assembling the Opt-In Configuration — The Activation Layer. A preview of what's coming: Smart QR Codes, Smart Links, Floaters, and 1-tap opt-in flows.
- Integrating the Data Captured — The Data Layer. A preview of POS / CDP / CRM integrations and dynamic token mapping.
- Building and Deploying — The Execution Layer. A preview of the launch flow: campaign consolidation, code generation, and go-live.
Inside Phase 1
Phase 1 is a list of sections. Each section has a Start button that opens a focused form; finishing one returns you to the section list with the next one ready to go.
- Tell us about your business — registered company name, tax ID, and industry classification used for carrier vetting.
- Contact Details — the internal stakeholders responsible for brand verification and registration.
- How you want to communicate with your customers — traffic origin, message types, and SMS backup number preferences.
- RCS branding — the public sender profile recipients see: display name, description, color, banner, logo, and privacy / TOS URLs.
- Campaign strategy — your primary messaging purpose (Promotional, Multi Use, Transactional, or Conversational), opt-in / opt-out / HELP flows, and example messages (10DLC requires at least two; one is fine for RCS).
- Compliance evidence — RCS compliance attestation.
- Verification documentation — supporting documents the provider may request during vetting.
The exact sections depend on what your brand is registering. A Toll-Free Number (TFN) brand, for example, skips the RCS branding and communication-preference sections — there's nothing to enter there — and finishes Phase 1 by preparing setup and submitting for review.
Exit Onboarding to use the rest of the app
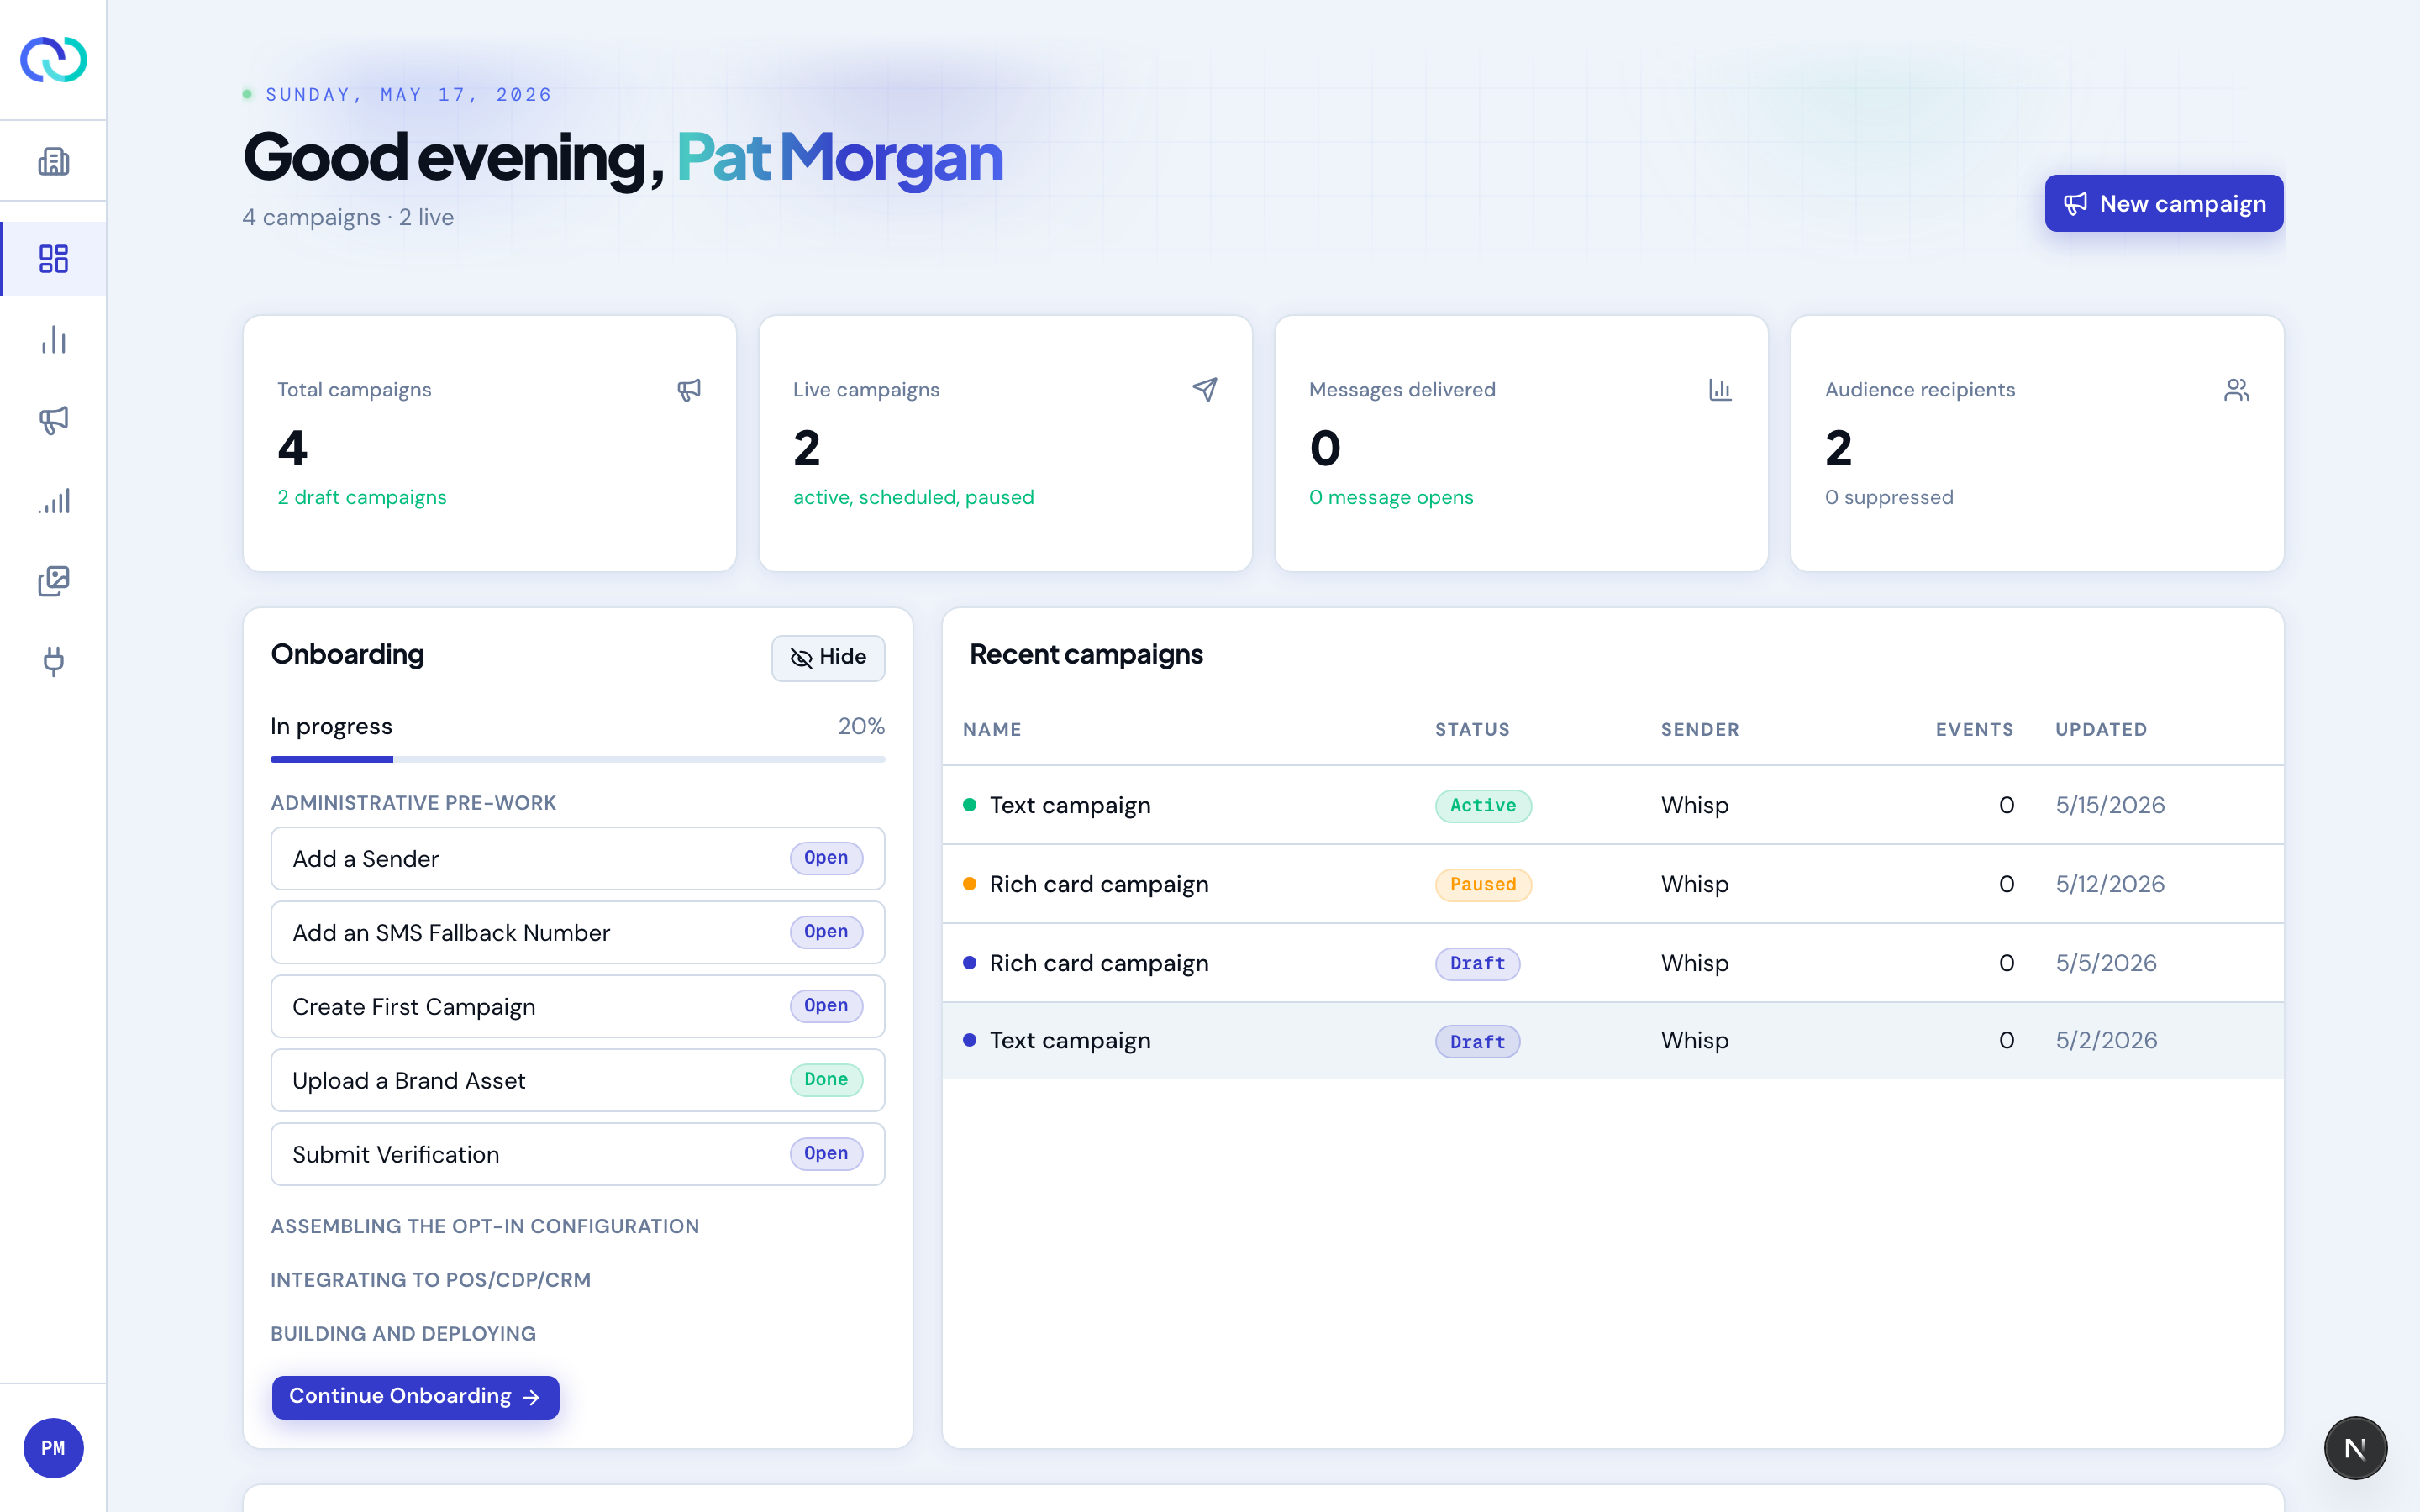
You don't have to finish onboarding in one sitting, and you don't have to finish it before browsing the rest of the app. Open the account menu in the top-right of the onboarding wizard and choose Exit Onboarding — that drops you back into the main app (dashboard, campaigns, senders, and so on). You can return to onboarding any time from the Onboarding progress card on the dashboard, or from Senders → Register RCS Agent.
Submitting Phase 1 registers your entity, brand, and campaign with the underlying RCS provider. The Senders page is the right place to watch the status — see Senders for what each status means.
The setup panel in onboarding tracks each step — phone number, brand verification, campaign approval, keyword setup, and RCS sender setup — and tells you which of you is holding things up. Waiting on carrier approval means there's nothing for you to do; Check for updates pulls the latest state on demand. If the carriers reject your messaging campaign, the panel switches to Your campaign was rejected and lists their feedback, with a Fix campaign & appeal button that takes you straight to the form. Most rejections are fixed by editing the campaign and appealing; if the problem is your primary messaging purpose, which the carriers fix at registration, the same form re-registers the campaign instead (see Senders). A rejection can arrive after setup has otherwise finished, so it will show up even once every other step reads as done — and it also appears as a banner on your dashboard.
Get oriented
Once onboarding is out of the way (or you've stepped out of it), the main app shell is the same shape for every brand user. The brand you're working in is shown at the top of the sidebar.
Your daily brief
If your brand has the daily brief turned on, the top of the dashboard shows two Aura cards. Signal is the one number worth looking at today — usually a chart or a stat, with a short line saying why it matters. Next move is the one thing worth doing, with a button that takes you straight there.
Both refresh once a day, before the start of your day in your brand's sending timezone, and they take into account what they told you on previous days — so an issue you have already dealt with stops coming back, and one you haven't gets louder. A card marked Sample is example content, not your data.
What each nav item is for
- Dashboard — your daily brief, at-a-glance numbers, your most recent campaigns, and a month calendar of scheduled and recurring runs.
- Analytics — delivery and engagement metrics for any campaign you choose, plus CSV export.
- Campaigns — the full list, with filters, plus the “New Campaign” entry point.
- Senders — your RCS agent (and SMS fallback number), your SMS senders, and your email senders, with registration and domain-authentication status.
- Inbox — replies from contacts that no automated follow-up handled. See Inbox.
- Assets — your image and media library.
- Integrations — forward unhandled replies to Slack, and connect external systems like HubSpot or Adora.
- Consent — look up one contact's opt-in status, or export your opt-in and opt-out records. See Consent.
- Credits — your Aura credit balance, what it went on, and a full statement. See Aura credits.
- Plan — the package assigned to your brand, what it includes, and your month-to-date Aura usage.
- Settings — brand-wide policies: the sending window, data retention, and your email footer. Your own preferences (theme, timezone, password) live in the account menu instead — see Settings.
Send your first campaign
The fastest path: a single-shot “immediate” campaign to a small audience.
- •
Open Campaigns → New Campaign
From the campaign list, click New Campaign top-right. - •
Pick a template
Choose Text for plain copy, File for a media-forward send, Rich Card for a single card with buttons, or Carousel for several swipeable cards. Empty starts you off with a blank editor when you want to build the message from scratch. If your plan includes email, Email sits in its own group below — it's a different channel rather than a different message shape, and it opens the email composer instead. - •
Write your message
The wizard shows a live phone preview on the right as you type. Quick replies and buttons appear under the message. - •
Add an audience
Upload a CSV of phone numbers, or paste a list. RCSync deduplicates the list, drops invalid numbers, and removes anyone on your brand's suppression list. See Audiences. - •
Choose a sender
Pick the RCS sender (and its SMS fallback) you want to send from. Most brands have a default sender — see Senders. - •
Send a test first
Use Send Test on the campaign detail page to send to a registered test phone before activating to the real audience. - •
Activate
For an immediate campaign, click Send. For a scheduled or recurring campaign, set the run time first; see Campaign types.
What to read next
- Campaigns overview — the lifecycle and what each state means.
- Governance & compliance — frequency caps, STOP / HELP, opt-outs.
- Analytics — how each metric is calculated.